
Oh my gosh, these are seriously cute Olaf Cookies!
I must admit that I really do enjoy the movie Frozen. I have watched it more times than I can count and can sing most of the songs. Yep! I admit it. 39 years old and I know the words to Frozen. 🙂
So I have to ask.....Do you want to build a snowman?

Olaf Cookies
Ok or maybe just make super cute Olaf Cookies. I am good without the snow and being cold. Staying inside and baking up delicious cookies sounds so much more fun!
Seriously Cute Olaf Cookies!
Cookie Recipe:
Cookie Ingredients:
5 C flour
2 teaspoon baking powder
1 teaspoon salt
1 ½ C soft unsalted butter
2 C granulated sugar
4 eggs
Royal Icing Recipe:
Icing Ingredients:
2 egg whites
1 C powder sugar
½ teaspoon cream of tartar
Black, orange, & blue gel food coloring
Cookie cutters:
Olaf Cookie Cutter
Large Snowflake
Cookie Directions:
- Cream the soft butter with the sugar until the combination is smooth, not grainy to the touch in a mixing bowl.
-Add all 4 eggs at one time. Continue to mix.
-Add the vanilla. Continue mixing.
-Sift the four, baking powder, and salt together.
-Add the dry mixture to the wet mixture.
-Continue mixing to make sure all ingredients are thoroughly blended.
-Make the dough into a ball, wrap it in cling wrap completely covering the entire dough ball.
-Put in the refrigerator for about 6 hours or overnight. Check to see if the dough is firm.
-Preheat oven to 325 degrees.
-Pull the cookie dough out of the refrigerator and sit it out to soften up a bit.
- Put flour out on the wood cutting board, rub flour on the rolling pin, and work some flour into
the batter. (if needed)
-Roll the dough out on the cutting board and using the cookie cutter to begin to make the cookies.
-Line the cookie sheet with parchment paper.
-Using a metal spatula move the cut cookies to the parchment-lined cookie sheet.
-Bake at 325 degrees for 8 minutes. Check to see if the cookies are thoroughly baked.
-Take the cookies off of the cookie sheet and put on a wire rack to cool completely.
(About 10 minutes).
Icing Directions:
-Combine all ingredients in a mixing bowl mixing on medium speed for 4 minutes. (except your food coloring)
-If icing is not stiff enough add ¼ C powder sugar.
- Take out 2 tablespoon of icing to dye orange in a small bowl.
-In a second bowl add 4 tablespoon of icing add several drops of blue gel food coloring. Stir to mix well.
-In the third bowl add 4 tablespoon of icing adding several drops of black gel food coloring. Stir to mix well.
-Put the remaining icing in the fourth bowl. This bowl of icing remains white.
-Spoon each color of icing into individual frosting bags with a #5 tip. Twist the open end of the bag to push the icing to the tip.
Icing Directions:

Olaf:
-Outline each of the cookies in white. Allow to dry for about 30 seconds. Fill in the cookies in with the white thinner icing.* Allow drying for about 30 seconds.
- * Squeeze the majority of the icing into a bowl then add 1 teaspoon of water to this and mix it in.
-Leave a small amount of the icing in the frosting bag for later use on the cookies.
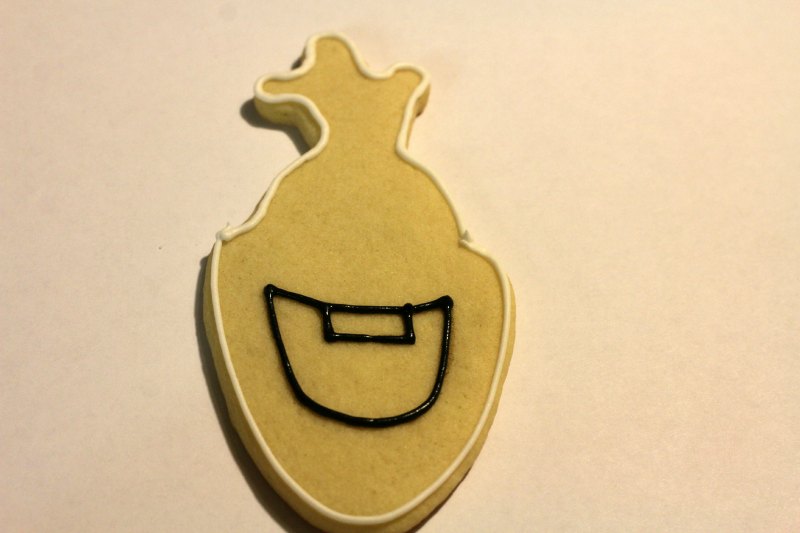
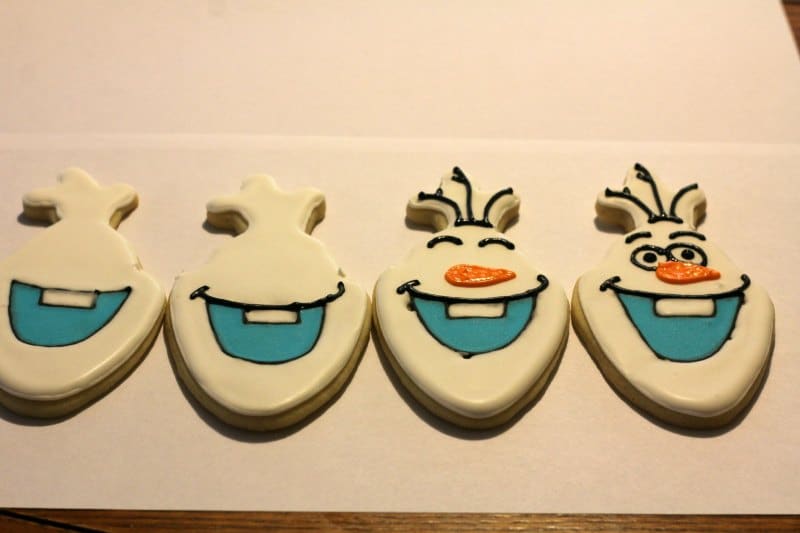
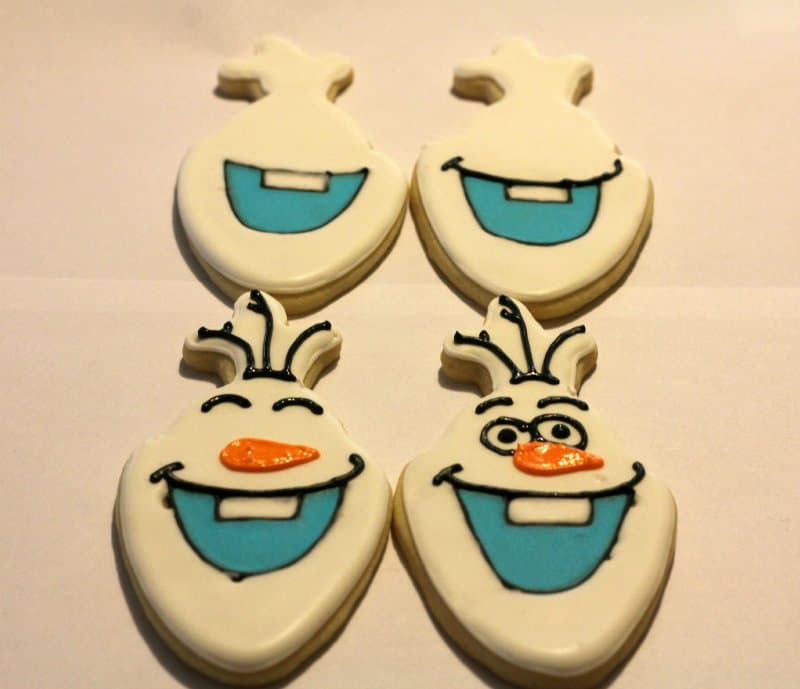
-Following Olaf's picture as an outline, draw hair (branches) eyes brows, eyes, eyeballs, nose, mouth & teeth with a Wilton Foodwriter.
-Using the black icing (following the Wilton Foodwriter drawings) darken the lines. Allow those lines to dry for abut 30 seconds.
-After the outline of the eyes and the eyeballs dry using the orange icing to outline the nose then fill it in. Allow the 30 seconds for the nose to dry.
-Fill in the square outlined in black for the teeth. Allow to dry for 30 seconds.
-Using the blue icing outline the inside of the mouth then using the a small amount of the thinner blue icing fill in the mouth.
-Allow for these completed cookies to dry for 5-10 hours.
Snowflake:
-Outline each of the cookies in white. Allow to dry for about 30 seconds. Fill in the cookies in with the white thinner icing.* Allow to dry for about 30 seconds.
- *Squeeze the majority of the icing into a bowl then add 1 teaspoon of water to this and mix it in.
-Leave a small amount of the icing in the frosting bag for later use on the cookies.
-Following the snowflake picture as an outline, draw details on the cookie with a Wilton Foodwriter.
-Following the drawings on the cookies use the blue icing to hi light those markings.
-Start by covering the lines from top to bottom, then side to side allowing 30 seconds for the lines to partially dry.
-Next add the accent points at each end of the lines in the blue icing. Allow 30 seconds for this to dry.
-Lastly add the five dots in the center of the snowflake in the blue icing.
-Allow the cookies between 5-10 hours for the cookies to dry completely.
Do you love recipes? Check out our copycat recipes, dessert recipes, and our CrockPot Recipes.
Follow Tammilee Tips on MSN, Facebook, Instagram, and Pinterest, for all of our recipe posts.

Ingredients
Cookie Ingredients
- 5 C All Purpose Flour
- 2 Teaspoon Baking Powder
- 1 Teaspoon Salt
- 1 ½ C Unsalted Butter soft
- 2 C White Sugar
- 4 Eggs
Royal Icing Recipe:
- 2 Egg Whites
- 1 C Confectioners Powdered Sugar
- ½ Teaspoon Cream of Tartar
- Black, orange, & blue gel food coloring
Instructions
Olaf Cookies
- Cream the soft butter with the sugar until the combination is smooth not grainy to the touch in a mixing bowl.
- Add all 4 eggs at one time. Continue to mix.
- Add the vanilla. Continue mixing.
- Sift the four, baking powder, and salt together.
- Add the dry mixture to the wet mixture.
- Continue mixing to make sure all ingredients are thoroughly blended.
- Make the dough into a ball, wrap it in cling wrap completely covering the entire dough ball.
- Put in the refrigerator for about 6 hours or overnight. Check to see if the dough is firm.
- Preheat oven to 325 degrees.
- Pull the cookie dough out of the refrigerator and sit it out to soften up a bit.
- Put flour out on the wood cutting board, rub flour on the rolling pin, and work some flour into the batter. (if needed)
- Roll the dough out on the cutting board and using the cookie cutter to begin to make the cookies.
- Line the cookie sheet with parchment paper.
- Using a metal spatula move the cut cookies to the parchment lined cookie sheet.
- Bake at 325 degrees for 8 minutes. Check to see if the cookies are thoroughly baked.
- Take the cookies off of the cookie sheet and put on a wire rack to cool completely.
- Icing Directions:
- -Combine all ingredients in a mixing bowl mixing on medium speed for 4 minutes. (except your food coloring)
- -If icing is not stiff enough add ¼ C powder sugar.
- - Take out 2 tablespoon of icing to dye orange in a small bowl.
- -In a second bowl add 4 tablespoon of icing add several drops of blue gel food coloring. Stir to mix well.
- -In the third bowl add 4 tablespoon of icing adding several drops of black gel food coloring. Stir to mix well.
- -Put the remaining icing in the fourth bowl. This bowl of icing remains white.
- -Spoon each color of icing into individual frosting bags with a #5 tips. Twist the open end of the bag to push the icing to the tip.
Icing Directions:
- Olaf:
- Outline each of the cookies in white. Allow to dry for about 30 seconds. Fill in the cookies in with the white thinner icing.* Allow to dry for about 30 seconds.
- *Squeeze the majority of the icing into a bowl then add 1 teaspoon of water to this and mix it in.
- Leave a small amount of the icing in the frosting bag for later use on the cookies.
- Following Olaf's picture as an outline, draw hair (branches) eyes brows, eyes, eye balls,nose, mouth & teeth with a Wilton Foodwriter.
- Using the black icing (following the Wilton Foodwriter drawings) darken the lines. Allow those lines to dry for abut 30 seconds.
- After the outline of the eyes and the eye balls dry using the orange icing to outline the nose then fill it in. Allow the 30 seconds for the nose to dry.
- Fill in the square outlined in black for the teeth. Allow to dry for 30 seconds.
- Using the blue icing outline the inside of the mouth then using the a small amount of the thinner blue icing fill in the mouth.
- Allow for these completed cookies to dry for 5-10 hours.
Snowflake Cookies
- -Outline each of the cookies in white. Allow to dry for about 30 seconds. Fill in the cookies in with the white thinner icing.* Allow to dry for about 30 seconds.
- - *Squeeze the majority of the icing into a bowl then add 1 teaspoon of water to this and mix it in.
- -Leave a small amount of the icing in the frosting bag for later use on the cookies.
- -Following the snowflake picture as an outline, draw details on the cookie with a Wilton Foodwriter.
- -Following the drawings on the cookies use the blue icing to hi light those markings.
- -Start by covering the lines from top to bottom, then side to side allowing 30 seconds for the lines to partially dry.
- -Next add the accent points at each end of the lines in the blue icing. Allow 30 seconds for this to dry.
- -Lastly add the five dots in the center of the snowflake in the blue icing.
- -Allow the cookies between 5-10 hours for the cookies to dry completely.
Kitchen Tools
- Cookie Sheets
- Parchment Paper
- Hand Mixer
Leave a Reply